data migration
What is data migration?
Data migration is the process of transferring data between data storage systems, data formats or computer systems. An organization can undertake a data migration project for numerous reasons, including when they're doing the following:
- replacing or upgrading servers or storage equipment;
- moving data between third-party cloud providers;
- moving on-premises infrastructure to cloud-based services;
- consolidating websites;
- performing infrastructure maintenance;
- migrating applications or databases;
- installing software upgrades; and
- moving data during a company merger or data center relocation.
The data migration process requires organizations to prepare, extract and transform data and to follow a specified set plan -- which differs by organization and migration.
 Click on the icon above
to download our free data
migration checklist.
Why is data migration important?
Data migration ensures that data is successfully and securely transferred to another application, storage system or cloud. Although moving data from one platform to another can be risky and costly, it also provides an organization with numerous benefits. For example, in addition to upgrading applications and services, organizations can boost their productivity and reduce storage costs.
Types of data migrations and their challenges
Data migration is typically performed using one of the following methods:
- Storage migration transfers data from one storage device to another. This involves moving blocks of storage and files from storage systems, whether they're on disk, tape or in the cloud. During migration is also an optimal time for organizations to perform data validation and reduction by identifying obsolete or corrupt data.
- Database migration moves database files to a new device. This is done when an organization changes database vendors, upgrades the database software or moves a database to the cloud. Databases must be backed up before migrating.
- Application migration moves an application or program from one environment to another. Application migration typically occurs when an organization switches to another vendor, application or platform. This process is complex because applications interact with other applications, and each one has its own data model. Successful application migration may require using middleware products to bridge technology gaps.
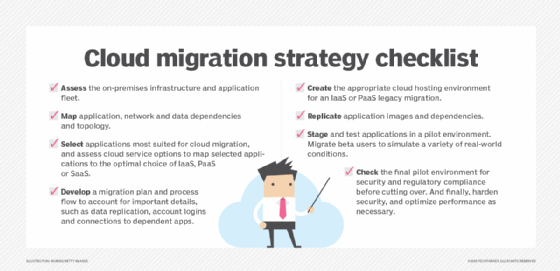
- Cloud migration moves data or applications from an on-premises location to the cloud or from one cloud service to another. Cloud migration is a common form of data migration. Cloud environments provide on-demand flexibility and scalability and reduce the capital expenditure (Capex) for on-premises infrastructures. Public cloud providers offer a variety of services for storage, database and application migrations.
- Business process migration moves business applications -- including customer, product and operational data -- and processes to a new environment.
During data migrations, teams must pay careful attention to the following challenges:
- Source data. Not preparing the source data being moved might lead to data duplicates, gaps or errors when it's brought into the new system or application.
- Wrong data formats. Data must be opened in a format that works with the system. Files might not have access controls on a new system if they aren't properly formatted before migration.
- Mapping data. When stored in a new database, data should be mapped in a sensible way to minimize confusion.
- Sustainable governance. Having a data governance plan in place can help organizations track and report on data quality, which helps them understand the integrity of their data.
- Security. Maintaining who can access, edit or remove data is a must for security.
Data migration strategies
Although implementation differs by migration type, there are still two main strategies organizations use: big bang and trickle migrations.
Big bang migrations transfer all associated data within a set time window. The advantages of creating a migration strategy around this method include lower cost, a quicker move and less complexity. The downside, however, is that big bang migrations require the system to be offline for the entire migration. There's also a risk of losing data if it isn't properly backed up to another location ahead of time.
Trickle migrations complete a data migration within phases. During the migration, both old and new systems run at the same time, so there's no downtime, which means there's less risk of losing data. However, trickle migrations are more complicated and need more planning and time to implement properly.
How to create a data migration plan
A data migration project can be challenging because administrators must maintain data integrity and time the project so there's minimal effect on the business and they can keep an eye on costs. Having a data migration plan helps to ensure there's minimal disruption and downtime to business processes.
Factors to consider during a data migration project include how long the migration will take, the amount of downtime required, and the risk to the business due to technical compatibility issues, data corruption or application performance.
Data migration planning should include the following general phases:
- Discovery. This should include considerations such as data sources, destinations, security, cost and which migration strategy to use.
- Resource assessment. Identify who will be taking part in the migration.
- Data inspection. Examine the data being migrated for data quality, anomalies or duplications. Data should also be backed up.
- Design. Data is organized and mapped out for where it's being moved to.
- Software tools. Any software that will help in the transition is purchased or created.
- Migration. The migration process is initiated.
- Cleanup. Old or legacy systems are shut down and decommissioned.
Examples of data migration tools include Microsoft SQL, AWS Data Migration Service, Varonis DatAdvantage and Varonis Data Transport Engine.
There are three broad categories of data movers: host-based, array-based and network appliances.
- Host-based software is best for application-specific migrations, such as platform upgrades, database replication and file copying.
- Array-based-based software is primarily used to migrate data between similar systems.
- Network appliances migrate volumes, files or blocks of data depending on their configuration.
Data migration best practices
The following best practices should be used to protect data during a migration:
- Back up before migrating data. If something goes wrong during migration and the data is lost, it can be restored from the backup.
- Understand what data is being migrated, where it lives, what form it's in and the form it will take at its new destination.
- Extract, transform and deduplicate data before moving it.
- Implement data migration policies so data is moved in an orderly manner.
- Test and validate the migration of data during the planning and design phase to ensure it's accurate.
- Audit and document the entire data migration process.
Data migration vs. data integration vs. data conversion
While data migration is the process of transferring data between data storage systems or formats, data integration is the process of combining data from multiple source systems -- creating a unified set of data for operational and analytical uses. The primary goal of data integration is to produce consolidated data sets that are clean and consistent. Integration is a core element of the data management process.
Data conversion is the process of changing data from one format to another. If a legacy system and a new system have identical fields, an organization could just do a data migration; however, the data from the legacy system is generally different and needs to be modified before migrating. Data conversion is often a step in the data migration process.
Follow these steps to help ease storage area network data migration challenges.